


How to Upcycle a Wooden Crate | Custom Stenciled Dino Crate Project
Your child will roar with joy when they see this Custom Stenciled Dino Crate Project from Oak Lane Studio!
Give that old wooden crate a fresh look and a fun, new purpose with this easy DIY stencil project.
Here's what you'll need:

- Custom Stencil Designer
- Americana Acrylic Paint
- Payne Grey
- Primary Yellow
- Kelly Green
- Primary Red
- Stencil Brushes
- Repositionable Spray Adhesive
- High Density Foam Roller (optional)
- Americana Acrylic Sealer (optional)
- Paint/Primer interior paint (white)
- Paper Plates
- Paper Towels
- Wooden Crate
Applying a Base Coat


First take your upcycled wooden crate and give it a base coat with a primer/paint combination. Give it as many coats as necessary to give a solid, even color. Let the paint dry for at least 24 hours.
Placing the Stencil


Prior to stenciling, carefully plan out how the shapes and text are all going to fit together on the crate end.
The first stencil is the T-rex. Oak Lane Studios has a wide variety of dinosaur stencils which are available in multiple sizes.
Turn the stencil over and spray a coat of Repositionable Spray Adhesive. Allow to dry for a few seconds and then position the stencil on the crate. Add a piece of Frog Tape to further secure the stencil in place.
Stenciling the T-rex


After thoroughly shaking the bottle, pour out a small amount of Americana Acrylic Paint in Kelly Green onto a paper plate. Soak the stencil brush bristles completely.


Next, swirl the brush on a stack of paper towels in order to remove excess paint. The brush should be barely wet during stenciling. Failure to do this will result in paint bleeding underneath the edges of the stencil design and make it impossible to achieve crisp, clean lines.


When stenciling, utilize the same swirling motion that you used on the paper towels. Apply the color using multiple light coats.
Another option would be to use a high density foam roller to paint the dinosaurs. With this, you would also remove excess paint on a paper towel. We would not recommend, however, using the roller to stencil the custom word stencil, as it may have trouble filling in the fine details of the letters.
Once finished with the first dinosaur, simply lift straight up and remove the stencil and tape.
Pterosaur Stencil


Repeat the above process for placing the Pterosaur, again using the spray adhesive on the backside of the stencil.


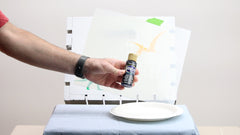
If desired, mix different colors of Americana paint to create unique shades, such as this orangey-yellow!


Again, apply the color in multiple, light coats with a barely-wet stencil brush.
Remove the stencil once finished.
Custom Word Stencil


Now, it's time for your custom stencil from Oak Lane Studio! If you wish to stagger words or lines, you can do so by painting a portion of the stencil, then repositioning it for the remaining words.


I chose Payne Grey for the text color.


After the bottom line is finished, move the stencil to line up the top line with its final location.


After completion, remove the stencil to reveal your fun new custom stenciled dinosaur crate!
To help protect your new design, consider spraying the crate with a coat of Americana Acrylic Sealer.
