


Twelve Month Welcome Porch Sign | Oak Lane Studio
Love each month anew with Oak Lane Studio’s Twelve Month Welcome Porch Leaner project!
Do you want to celebrate each month of the year but don't have space to store twelve different porch signs? Well, Oak Lane Studio has the stylish solution for you!
Here's what you'll need:


IMPORTANT: Dimensions below reflect what was used for this tutorial. However, the kit does come in different sizes. Visit the product page for details.
- 12 Month Welcome Porch Leaner Kit
- "WELCOME" 8" x 48" Stencil
- 12 Individual Monthly Design Stencils (5.25" x 5.25")
- 6 Reversible wood squares with pre-drilled 1/8" nail holes (5.25" x 5.25)
- Flat board for "Welcome" sign: 10" x 50" (or larger if a border is desired) or 8" x 48" (with no border)
- Americana Acrylic Paint
- Black
- Primary Yellow
- True Red
- Soft Blue
- Pumpkin
- Forest Green
- Lavender
- Kelly Green
- Melon
- Dioxazine Purple
- Royal Fuchsia
- Honey Brown
- Repositionable Spray Adhesive
- Americana Matte Finish Acrylic Sealer
- High Density Foam Roller
- Stencil Brush Long Handle
- Frog Tape
- Small nail
- Hammer
- Sand paper
- White exterior paint
Preparation
Once you’ve chosen the wood for your welcome sign, cut it to the appropriate dimensions for your “Welcome” stencil (see above).


Next, sand the board (if it’s repurposed or if it has paint on it already) and wipe away the saw dust. Paint the board using a quality white exterior paint. Do the same for both sides of your six squares.


Once the base coat is dry, take some Repositionable Spray Adhesive and spray the back side of your “Welcome” stencil. Place the stencil onto the board, ensuring that it is centered, and press to make sure it is making good contact all around.
Painting


Now you can grab your first color, Americana Acrylic Payne Grey, and shake the bottle prior to pouring out a small amount onto a washable or disposable container. Using a high density foam roller, apply the color in thin coats. Remove excess paint from the roller by rolling it onto a paper towel. This will prevent paint from bleeding underneath the stencil.
Once the letters are finished, place Frog Tape painter’s tape around the edge of the stencil to create a border for painting. This step may or may not be necessary depending on the size of your board.
Apply the color using the roller as described above. Once the border is complete, pull the stencil (and tape) to reveal your new welcome sign!
Stenciling


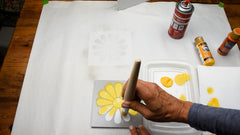


For any particular month sign, you might wish to choose a different background color, but you will definitely want the base white coat to start out with. To stencil each month sign, once again utilize the Repositionable Spray Adhesive.
Paint each sign by stippling lightly with a stencil brush. Again, use a paper towel to remove excess paint and prevent bleeding underneath the stencil.
Finishing

For additional protection once everything is painted, try adding a few coats of Americana Matte Finish Acrylic Sealer.


Next, take a straight edge a place it from the top corner to the bottom corner for each square. Mark where the hole will be placed along this line but close to the top corner. Drill a small hole for each of the twelve signs.
Take one of the drilled signs and place into position over the “O” in the “Welcome” sign. Mark where the hole is, place the square aside, and hammer a small nail where the mark is. This is how each month will hang from the porch leaner.


That’s it. Place your new “Welcome” sign outside your door and make it new every month with your interchangeable decorative monthly squares!